Stages of Carving a Spoon
The stages start with a split branch of green wood. I start off with a sharp hatchet, but here are some finished spoons to give an idea of where we’re headed:

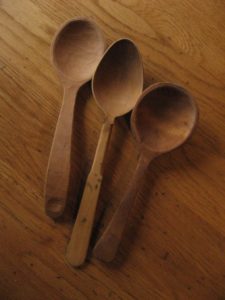
first, some finished spoons: (l to r) one of mine, a traditional (eastern European?) spoon, which might be boxwood, and a Bill Coperthwaite spoon.
finished spoons, other side; click on the photo to see more about the geometry and design of the lovely center spoon.

6 stages of roughing out a spoon (from R. to L! My brain was in another country). Hatching (in red/black) shows the wood to be removed. Simple, quick strokes of the hatchet, always working in facets at 90° to each other. Squareness allows you to see the proportions immediately.

1st cut: bevel the back of the bowl

rough out the bowl (in general, the bowl should be 1/3 of the total length of the spoon)

shape the handle; keep the edges clean!

when shaping the handle, you can usually get most of the waste wood off with one or two splitting blows from the end going down to the bowl

taking out the small wedge between bowl and handle establishes the all-important angle that keeps the soup in the spoon on its way to your mouth!

after you take out the small wedge, you shape the handle accordingly. The tricky bit is cutting the face of the bowl: it takes a cross-grain slice, with the spoon laying sideways on the block. Stay tuned for a video or time-lapse…

you could eat with it!

but it will be more beautiful if you finish shaping: this is the first time you’ll cut at less than a 90° angle, but keep the cuts roughly symmetrical

shaping the roundness of the bowl is where you start needing more control than a hatchet provides; use a knife

facets show the volumetric proportions. It’s important to keep the edge of the bowl a consistent thickness. If you don’t, you may have to adjust the shape of the bowl to accommodate thinner or thicker spots at the edges.

Only now do you need a crooked knife or gouge to hollow out the bowl

You can get to this stage in short order; finishing can be long and slow, or quick and dirty. I like a blade finish, and it’s a good challenge to see how well you can round things with just a blade; on some woods you can use a scraper, too.
Can you post pictures of the tools. I had no idea I’d ever want to carve a spoon but I want to try.
I’m behind on website management, but if you look up spoon-carving on youtube, you’ll find lots!
Te felicito es hermoso lo que haces voy a intentar hacer algunas cucharas ,te agradezco tus enseñanzas un abrazo grane desde Argentina
Very cool. Thanks!