
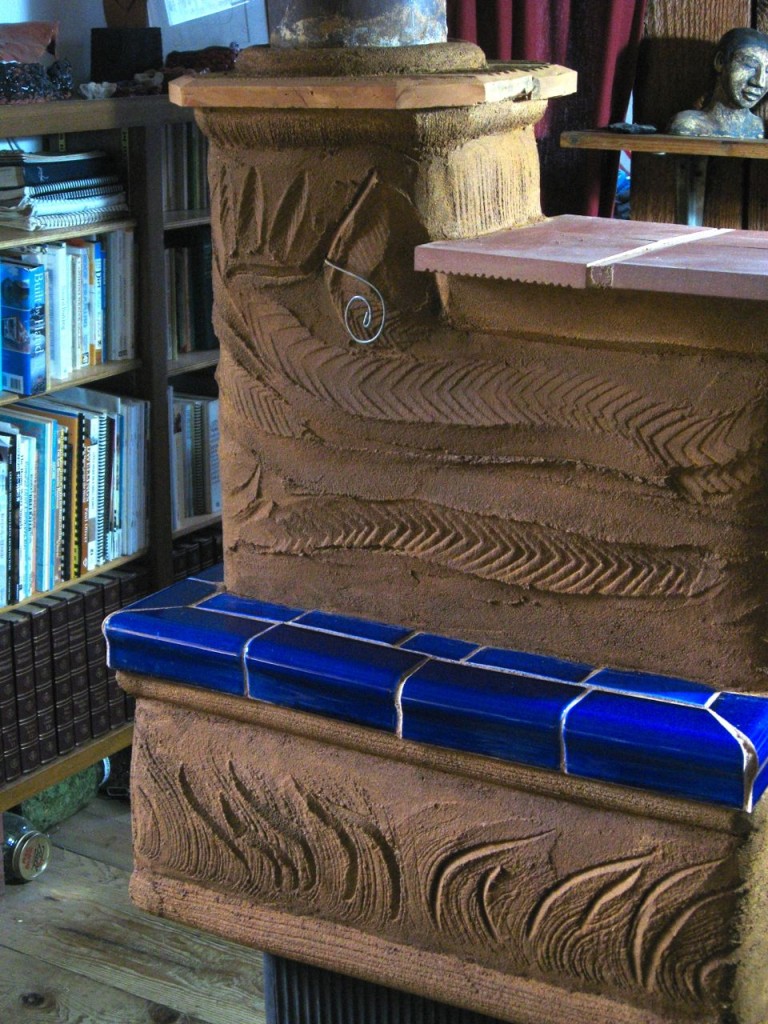
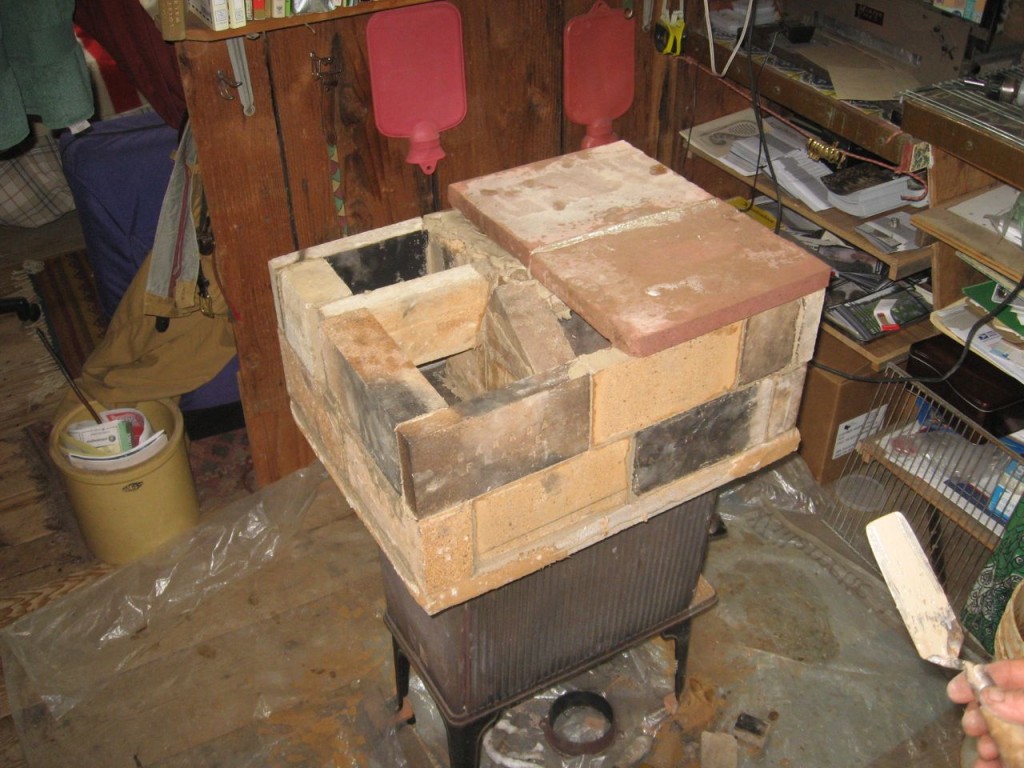
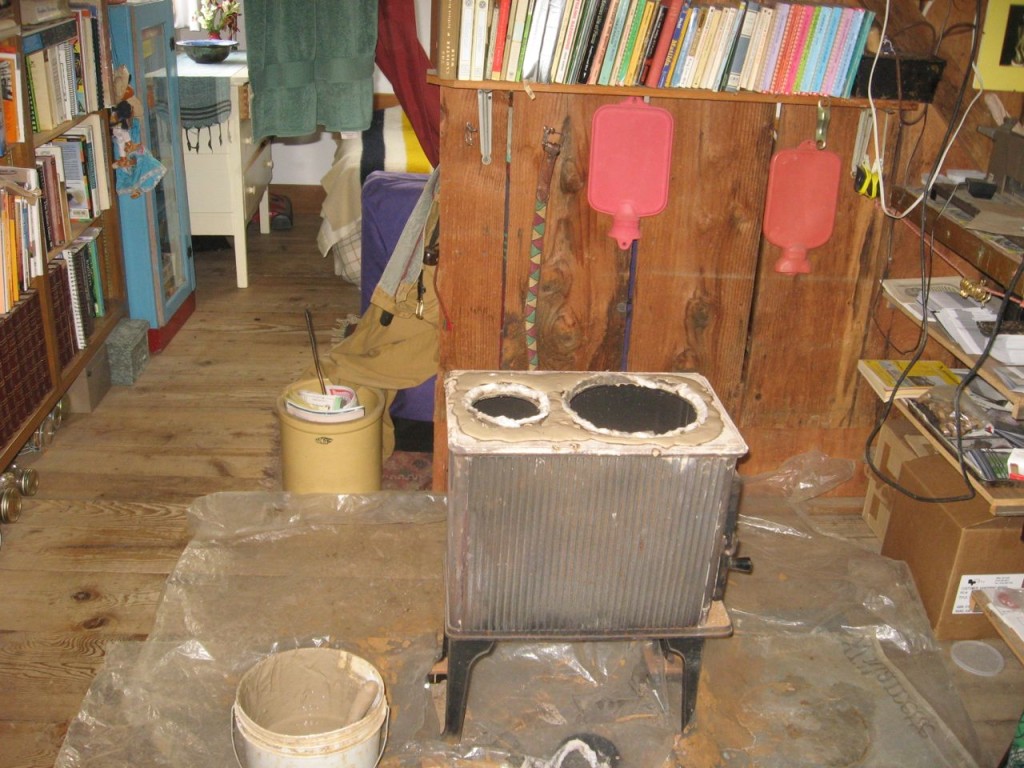
about 300 pounds of masonry makes a small space comfortable for 10-24 hours on very little fuel. It’s also hard to make it burn dirty – within minutes of ignition, there’s no visible smoke from the stack, and you never damp it down.
Increase woodstove efficiency with bricks and mud
This is a pretty simple do-it-yourself option for anyone interested in increasing the efficiency of an old (or new!) woodstove.
That said, a heater in the home poses serious risks — greater than an outdoor oven, and potentially greater than the old stove itself. But it’s not rocket science; masonry heaters were developed and designed by people who worked for love, not money (the whole story is in David Lyle’s Book of Masonry Stoves: Rediscovering an Old Way of Warming).
The videos below show (roughly) how it goes together. In addition, I’d recommend you look up the Masonry Heater Association, and Alex Chernow’s website. Alex has been developing bell stove designs, and has links to a Russian heater builder who makes brilliant sense of the theory, which is really just flow — think funnels full of water, then turn ’em upside down and re-envision the water as hot gases. Everything goes from there.
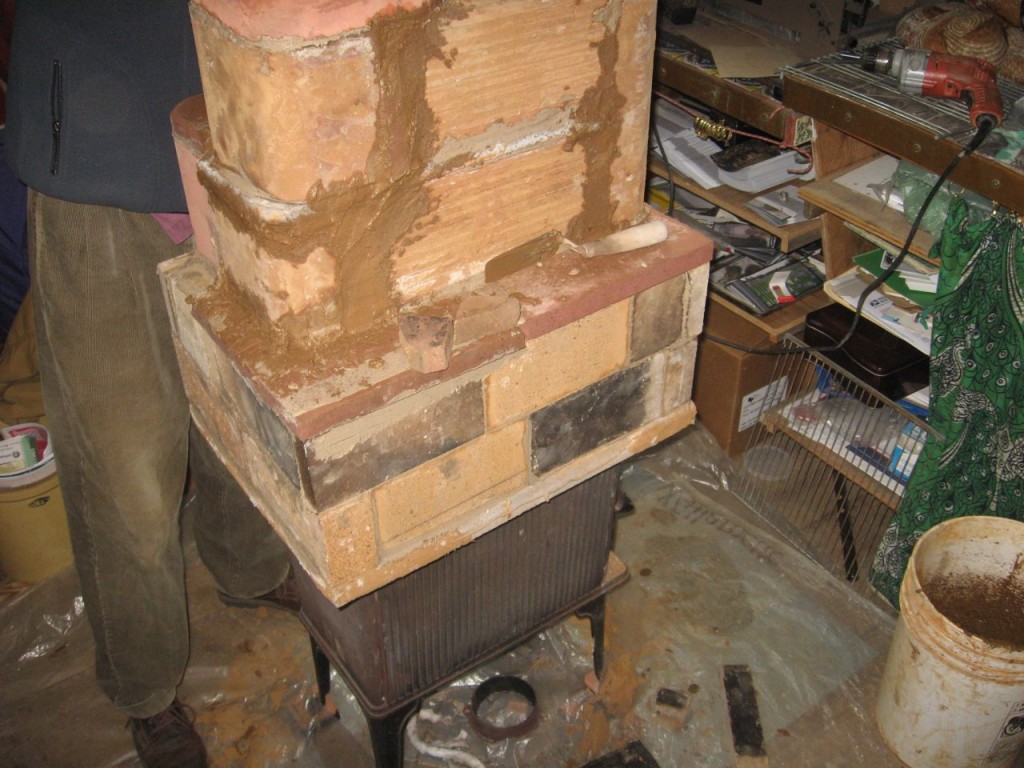
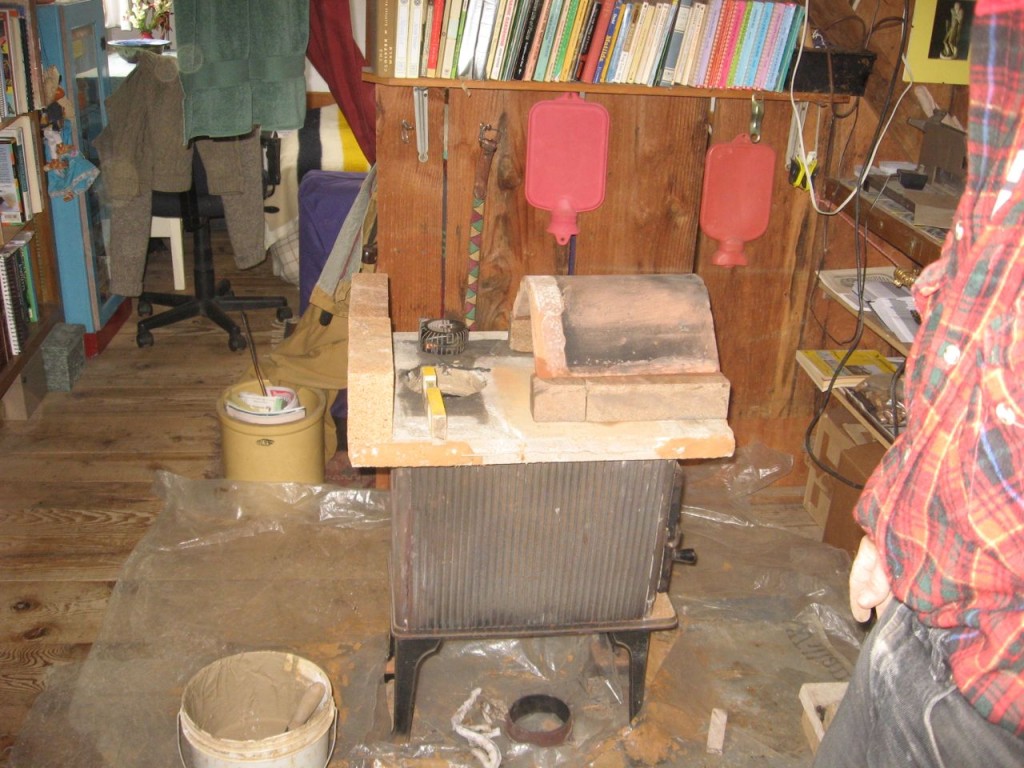
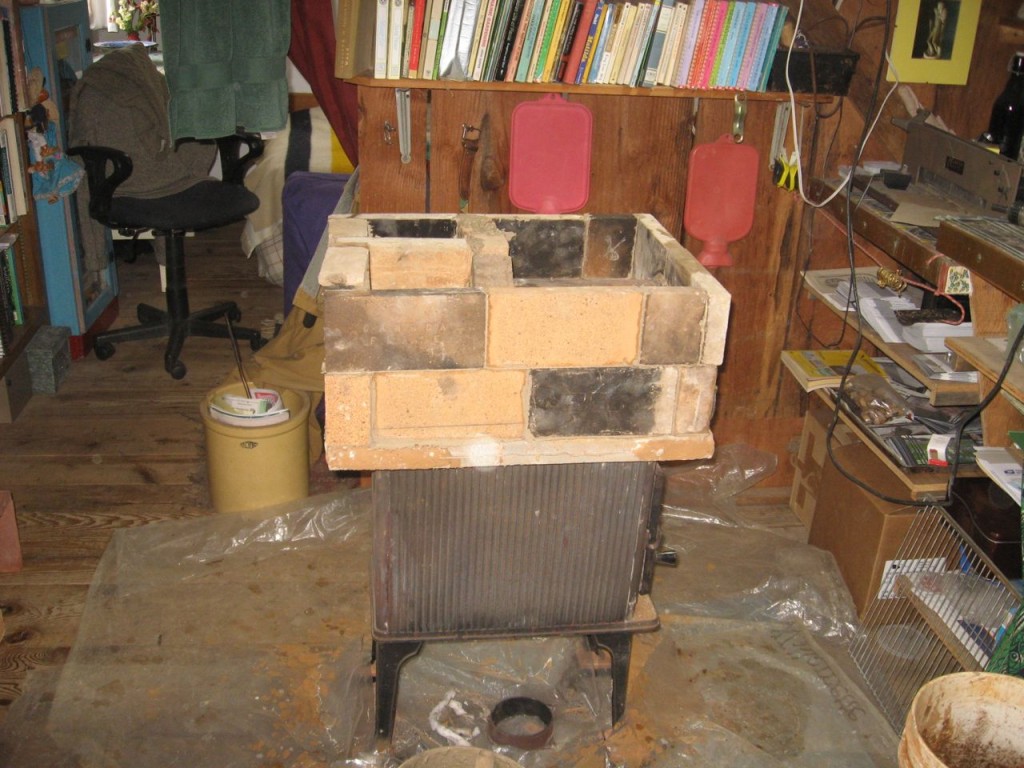
It helps to get the bricks and mortar right, especially if you’re only building a heater that’s a single brick thick. The goal is to combine similar materials (mortar made of the same clay as the bricks, etc.) to limit (even prevent!) cracks in the masonry that could compromise function and/or safety (I do have some cracks in mine, but they don’t seem to greatly affect performance. I’ll be able to say more after I open it up for maintenance/examination — after (another!) heating season is over.)
I’ve been reluctant to publish formal plans or how-to info as I consider this to be an experimental prototype, but rocket goddess (and Sketchup artist) Erica Wisner was inspired to draw up some basic plans, and convinced me that they should be available for other experimenters. So, if you’re inspired to try something of your own, please feel free to download the drawings (free! through the bookstore) — but note that there are important detail photos at the bottom of this post which will clarify some important points that aren’t covered in the pdf). I’ve also been answering questions in the replies below the post, so read through those, too. And take good care! That mean build and test your design somewhere outside before you do your final installation! Also design and build-in a better clean-out, and send us your news and photos so others benefit from your experience!
We would be happy to publish any stories of successes — and failures! — as that’s authoritative in a much more important way — taking responsibility for one’s own experiments, as well as one’s own heat…
NEW, ADDITIONAL NOTES TO THE PDF SCHEMATIC:
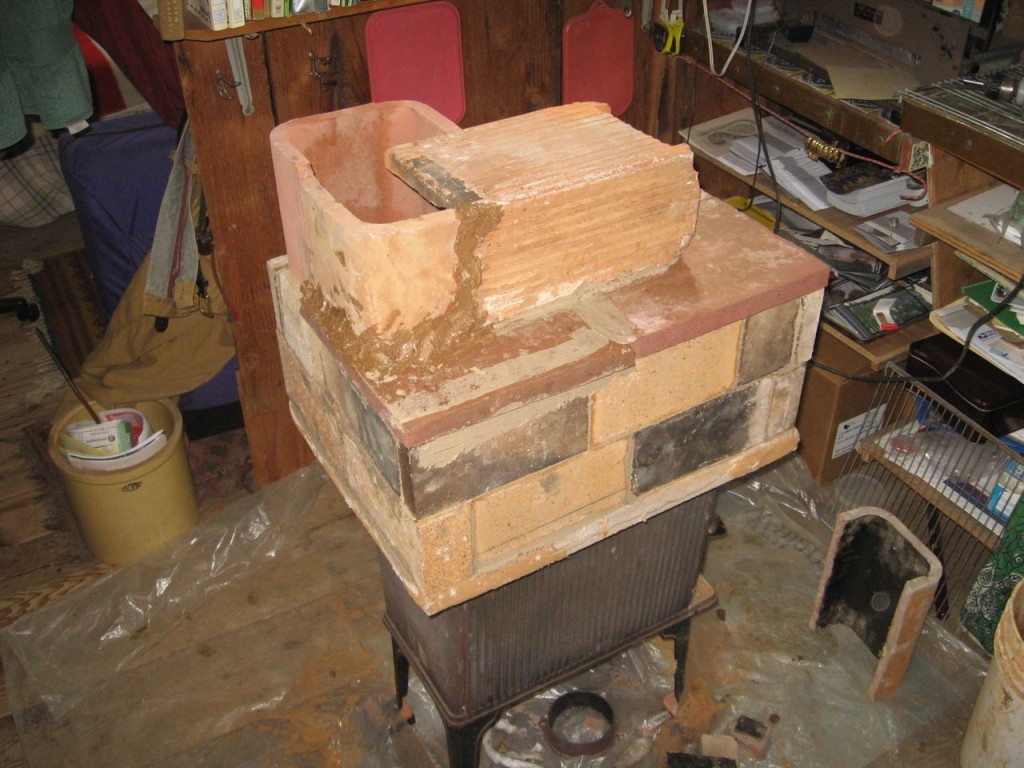
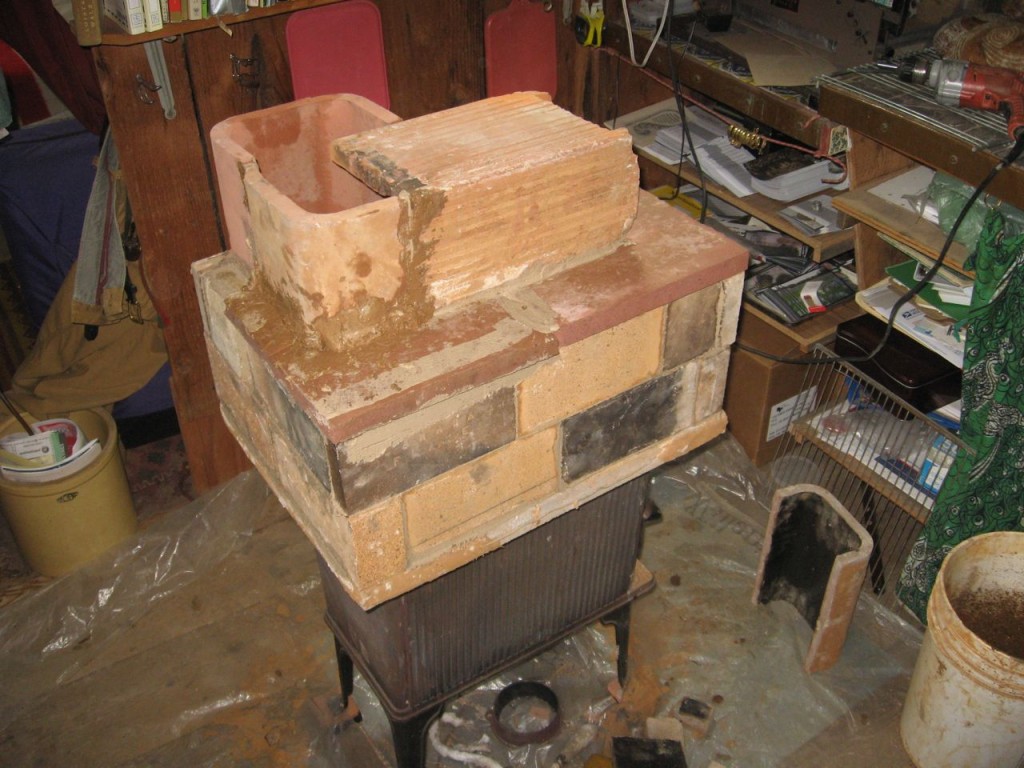
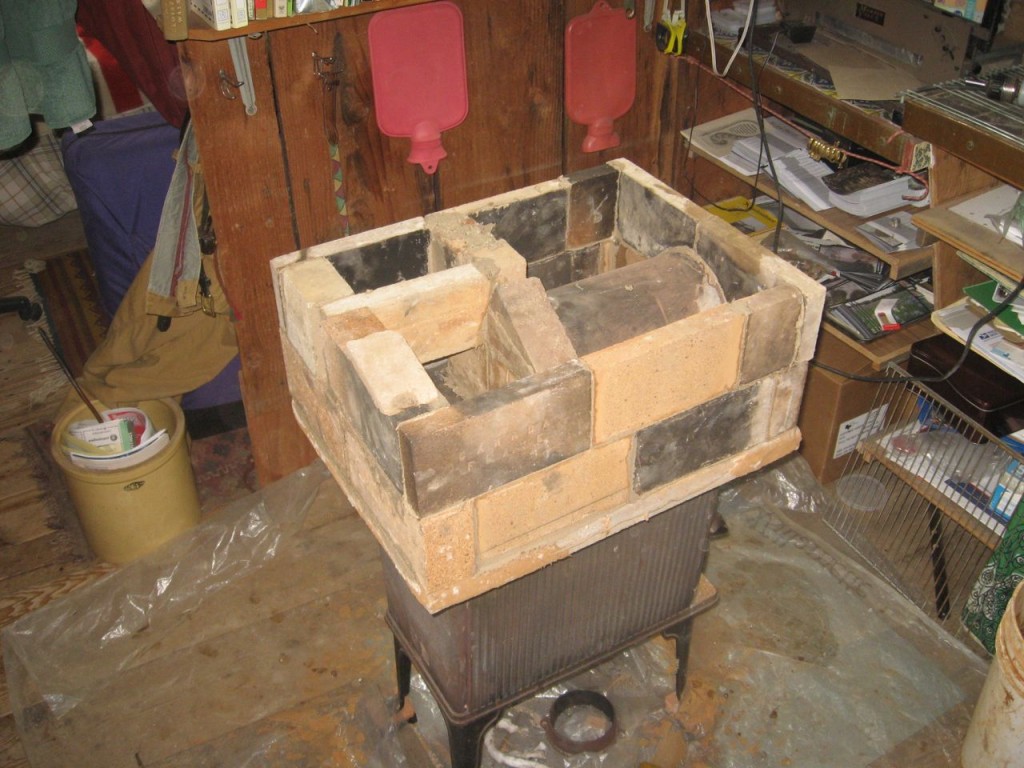
After poring over photos and dredging up old memories, I’m fairly certain that the oven chamber is functioning as a “bell,” with the middle vertical brick in course 3 functioning as a “dam” to hold the hot gasses at the level of the top of the oven. You could also design it so the gasses flow through the oven chamber. Your choice. Whatever you do. test it out before you install! And follow the above links to learn more about bell theory and gas flow.
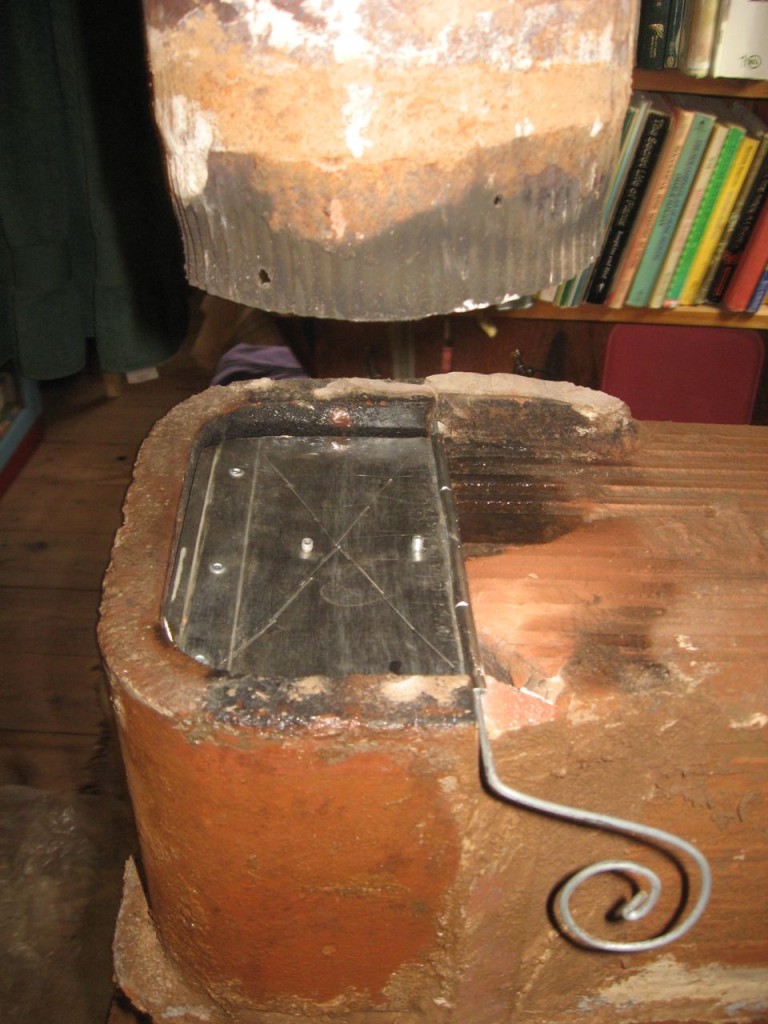
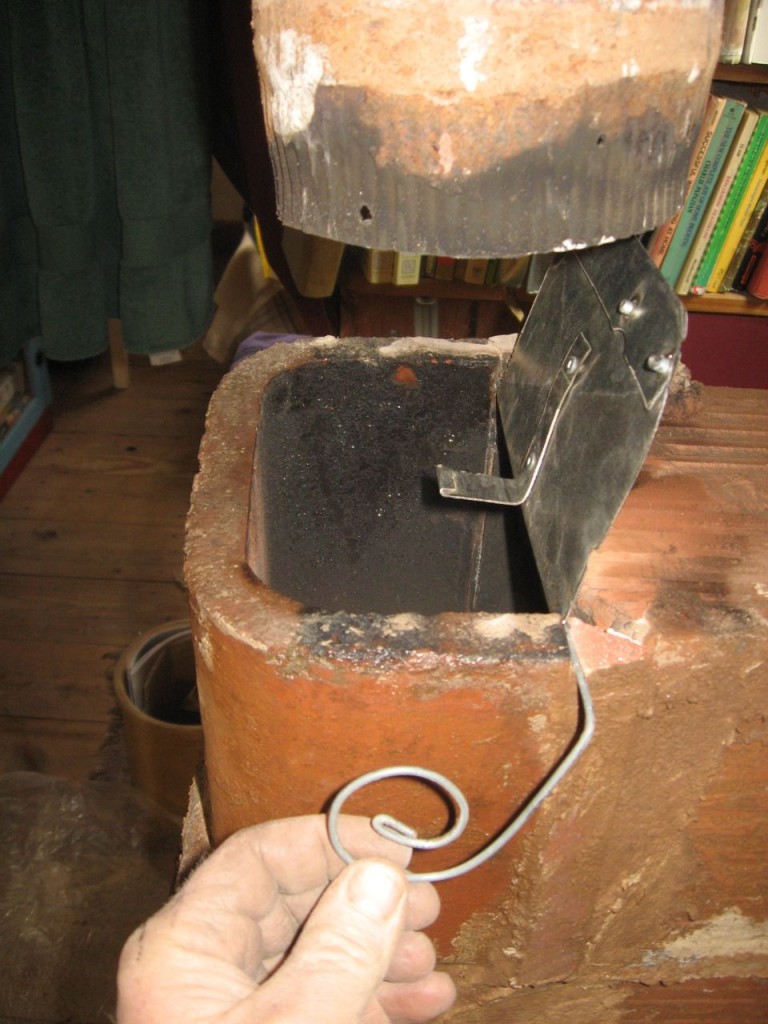
At fig. 7, there is a damper made out of stainless sheet metal. See the detail photos for a good view: the hinge is a bit of wire running L to R along the upper side. The sheet metal wraps around the wire. The L end of the wire makes a pin which sits on the brick. The R side goes through the brick to make the handle, which is bent into a spiral.
What would be fig 8 (see detail pix) is just a final bit of square tile to make the final connection to the metal chimney. The end of the metal pipe is wrapped in a kaowool gasket mudded in place (visible in the photo as a 1/4 round collar).
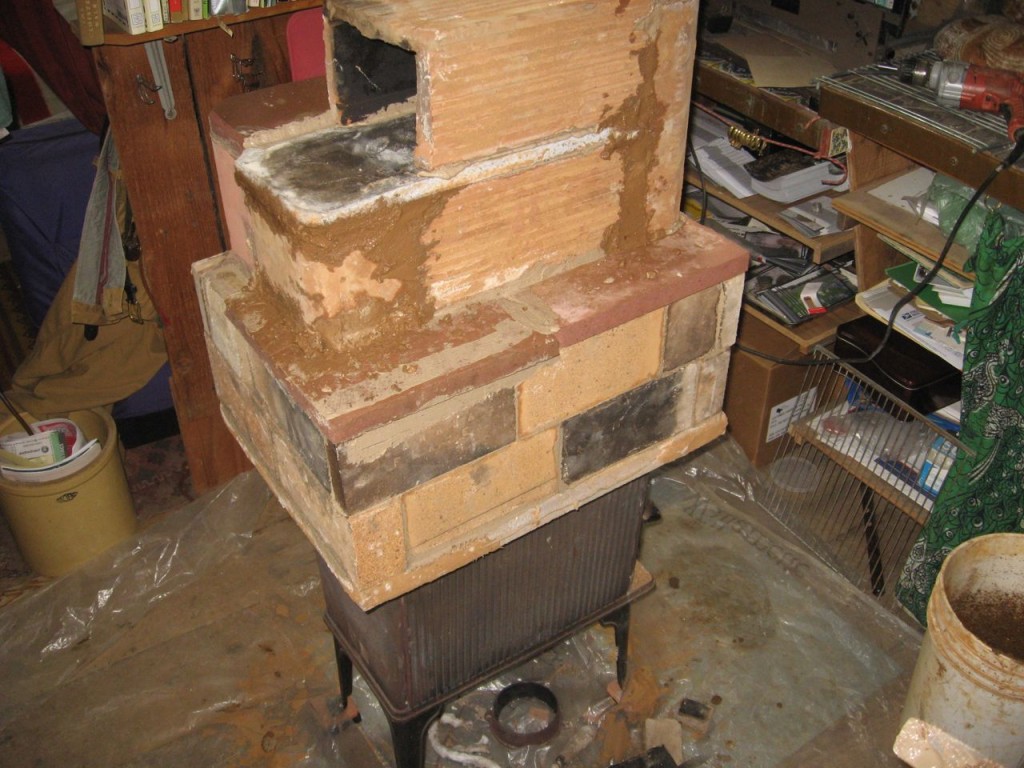
On cracking: most of the cracks are vertical. Three of them extend from level 2 to level 4, one each at the corners, and one in the middle. The middle crack continues up through the next level — that’s the widest one. The horizontal crack is at level 4, from the bottom L up to the bottom of the flat red tile.

Well I’m about to embark on a similar adventure to boldly go where no stove has gone before, or so I thought until I found this thread. Hours of staring at the stove pipe and wishing I could reclaim the lost heat, combined with a love of the mysterious masonry heater that filled a Swiss mountain chalet in the days of my youth are compelling me forward. So I have a large cast iron jotul about twice the size of the one above, and a stack of bricks and some Eco therm insulation blocks, plenty of clay and the winter coming on…… I’ll let you know how it goes….
questions via email:
Hello Kiko,
The added text and photos make your Masonry Heater Hat much more clear. Seeing how you made the stainless steel damper is very helpful. But I still have a few more questions… [ed. note: I’ve inserted my answers to these questions directly into the text below. — Kiko]
Q: When the smoke first exits the iron stove can it either circulate around the top of the oven, as well as taking a more direct path into heat-absorbing labyrinth? In other words, can the smoke take one of two paths, or must all of it circulate over the top of the oven? It appears to me that the smoke can take two paths.
A: as drawn in the plans, the oven chamber will function as a “bell” — a chamber where gasses stratify, allowing for heat transfer up high, and flow below (cooler gases would flow below the central yellow brick at the bottom, over the round hole from the firebox). However, I may have actually left a passage on the right side of 3a and 3b, to allow hot gasses to flow through the oven chamber. Since I haven’t opened it since building it (several years ago now), and since I didn’t manage to document every detail, I can’t say for certain. That said, both strategies can work. Look up “bell theory” for more info and designs, and see the “russian rocket” post in the home heat section here on handprintpress.
Q: What is the purpose of the second slab of refractory cement (layer 6)? Why don’t you instead use flat sections of the flue tile, such as you use in layers 4, 6, and 7 to cap off vertical runs?
A: layer 6 is a thin casting of leftover refractory that I used to add mass and to cover a gap that needed covering. The whole thing was made of scrap bits and pieces.
Q: Is the first slab of refractory cement (layer 1) reinforced in any way? How thick is it? Since it overhangs the iron stove is there any concern that it might crack and break under the load of the masonry it is supporting?
A: layer 1 is not reinforced. It’s 1.5″ thick. The overhang is approximately 3″. I thought of adding legs for extra support, but after I’d built it, it seemed to me that the weight of the masonry was not enough to cause an unsupported 3″ of layer 1 to shear off. So far, I haven’t seen any evidence to the contrary. See Max’s comment (after this one) and sketch of another solution to this problem.
Q: From the added photos it appears that the Layer 1 slab has a hole in it under the oven section, presumably to allow more heat from the iron stove to radiate into the oven. That hole is not shown in the PDF diagram. Do you bridge that hole with anything when it comes time to actually bake something in the oven?
A: No: layer 1 only has the one hole. The hole you’re seeing and referring to is actually a hole in the top of the iron stove itself; it was originally covered by an iron plate over the firebox. I removed the plate to allow more direct heat transfer to the bottom of layer 1, which does also serve as the oven floor.
Q: Have you ever heard of anyone building a masonry heater using flexible or rigid stainless steel smoke pipe instead of fire brick or flue tile to conduct the flue gasses, and then just using ordinary brick to absorb heat, and for the main structure?
A: Yes, absolutely. What you’re describing is the ducting approach used in building a rocket mass heater. But if you’re going to go to the trouble of wrapping the pipe in brick, you don’t really need the expensive pipe, too. By the same token, if you use pipe, you can just wrap it in cob (much easier than laying brick!)
Q: It seems to me that an inexperienced DIY mason would be better off relying on the SS pipe to not leak smoke, rather then hoping that he had designed the firebrick channels in such a way that they did not crack. Plus, the round, smooth SS pipe would create less turbulence of the smoke, and so might draw better then the square-ish masonry smoke channels.
A: yes. The basic masonry heater design came from an era when steel pipe was not available. However, despite all theoretical concerns about flow and turbulence, the square brick channels work! That said, many modern heater masons will use extruded clay tiles for channels exactly because they’re smoother and easier than laying lotsa little brix. Finally, depending on how hot the pipe gets, metal and masonry together can generate problems due to the fact that metal expands more with heat than masonry.
Thanks again for sharing your interesting ideas,
John Hess
Also, here is an excerpt and photo from communication with Chris Mcclellan that shows an alternate and very promising way of adding mass to an existing stove:
“The last idea I wanted to bug you with is that I’ve seen some really cool fireplaces from rammed earth and it seems that you should be able to form up a much more efficient design either around a stovepipe or a series of wooden forms that are slightly tapered and oiled to make them easily removable, or a heavy cardboard form you can burn out. It looks like rammed earth is probably more resistant to thermal shock cracking than many of the materials like firebrick that have to be pieced together rather than cast in a complicated useful shape. I am currently enjoying a downdraft bypass on my bargain basement woodstove’s flue running through a cob bench and storing all that heat that was going up the chimney before. Very little creosote buildup but I am watching it. It seems to keep the house warmer longer with a lot less wood. I included several handfulls of fibermesh fiberglass reinforcement fibers from the concrete supply place in each mixer full of cob instead of straw and it seems to be helping things stay together.”
It is exciting to begin to develop these neat ways of continuing this conversation. Please…. all with ideas…. contribute them…. we’ll continue to organize them in better ways. Notice that you can subscribe by email to further additions to this conversation below.